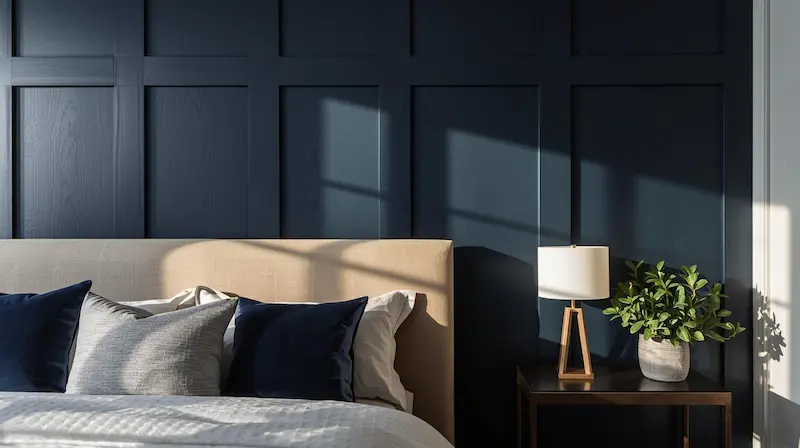
Walk into any high-end custom home or scroll through the top interior design feeds on Instagram, and you will see it: Texture.
Flat drywall is boring. It lacks character. It lacks depth. For years, the only solution was expensive wallpaper or complicated plaster finishes. But recently, one architectural detail has taken the DIY world by storm: Board and Batten.
It is the “Little Black Dress” of interior design. It works in a modern farmhouse nursery, a moody traditional dining room, or a contemporary hallway.
Here is the best part: Unlike a kitchen remodel or a deck build, this is a project you can genuinely finish in a single weekend. And if you use the materials I recommend below, you can transform an entire wall for under $200.
If you have been looking for the perfect entry-level renovation project, this is it. In this DIY board and batten accent wall tutorial, we will skip the complicated carpentry jargon and focus on the simple math and installation tricks that guarantee a professional look.
What is Board and Batten?
Historically, “board and batten” was an exterior siding style. Today, in interiors, it simply refers to installing vertical strips of wood (battens) over your existing wall to create a geometric, 3D paneling effect.
You aren’t actually replacing the wall. You are just adding “ribs” to it and painting everything one color to make it look like solid custom millwork.
Part 1: Tools and Materials (The Shopping List)
You don’t need a contractor’s van full of equipment, but you do need a few specific tools to make this easy.
The Materials
-
The Boards: For interior walls, do not use regular pine lumber (like 1x3s) from the lumber aisle. They are often warped, knotty, and require tons of sanding.
-
Pro Tip: Buy Pre-Primed MDF Boards (usually 1×3 or 1×4 size). MDF is dead straight, smooth, and cheap.
-
-
Panel Adhesive: “Liquid Nails” or a similar construction adhesive.
-
Spackle / Wood Filler: To hide the nail holes.
-
Caulk (Paintable): This is the secret to making it look expensive.
-
Paint: Use a durable finish like Eggshell or Satin.
The Tools
-
Brad Nailer: You can rent one, but owning a simple 18-gauge brad nailer is essential for DIYers.
-
Level: A 4-foot level is best.
-
Tape Measure & Pencil.
-
The Saw: You will need to make precise, clean cross-cuts for your boards. If you are still setting up your workshop, a reliable miter saw is the most important investment you can make for this project.
-
Not sure which one to buy? Check out our guide on [The 7 Best Miter Saws for Beginners] to find the right one for your budget.
-
Part 2: The Dreaded Math (Made Simple)
The hardest part of this project isn’t the sawing; it’s the spacing. If you just start nailing boards randomly, you will end up with a weird, skinny gap at the end of the wall.
You want your “bays” (the empty spaces between boards) to be exactly equal.
Here is the Magic Formula:
-
Measure Wall Width: Let’s say your wall is 120 inches wide.
-
Choose Batten Width: Let’s say you are using 2.5-inch wide MDF boards.
-
Estimate Number of Battens: Guess how many vertical strips you want (including the two end pieces). Let’s guess 7 battens.
-
Calculate Total Wood Width: 7 battens x 2.5 inches = 17.5 inches of wood.
-
Calculate Remaining Space: 120 (wall) – 17.5 (wood) = 102.5 inches of empty space.
-
Calculate Spacing: Divide the empty space by the number of “bays” (which is always one less than the number of battens).
-
102.5 inches / 6 bays = 17.08 inches.
-
The Result: If you install 7 battens, the space between each one will be roughly 17 inches. If that looks too wide, add another batten and re-calculate.
Tip: Use an online “Board and Batten Spacing Calculator” to double-check your math.
Part 3: Step-by-Step Installation
Step 1: Prep the Wall
Remove any outlet covers.
-
The Baseboard Decision: For the cleanest look, carefully pry off your existing baseboards. You will install a flat 1×4 or 1×6 board as your new “bottom rail.” If you are lazy (no judgment!), you can rest your vertical battens on top of your existing curvy baseboard, but you will have to cut the bottoms at a 45-degree angle to make it look decent.
Step 2: Install the Horizontal Rails
Install your top horizontal board (near the ceiling) and your bottom horizontal board (the baseboard).
-
Apply a squiggle of Liquid Nails to the back.
-
Use your level to ensure they are perfectly flat.
-
Nail them into the studs where possible.
Step 3: Mark Your Vertical Spots
Using the math from Part 2, take your tape measure and pencil and mark the center of where every vertical batten should go. Don’t install them yet—just mark the wall to ensure it looks right visually.
Step 4: Install Vertical Battens
Measure the height for each batten individually. Your floor and ceiling are likely not perfectly parallel.
-
Cut the MDF board to length.
-
Apply glue.
-
Place it on your mark. Use your level to make sure it is perfectly plumb (vertical).
-
Nail it in. Since these vertical boards often won’t hit a stud, verify that you angle your brad nails slightly (shooting in an “X” pattern) to grip the drywall, relying on the Liquid Nails for the real holding power.
Step 5: The “Pro” Finish (Caulk & Fill)
This is the step that separates DIY disasters from professional work.
-
Fill Holes: Put a dab of spackle on every nail hole. Let dry, then sand flat.
-
Caulk Seams: Run a bead of paintable caulk along every edge where the board meets the wall. This fills the tiny gaps and makes the wood and drywall look like one seamless piece.
-
Warning: Do not skip caulking. Without it, you will see dark shadow lines that make the project look cheap.
Step 6: Paint
Paint the entire wall—boards, trim, and the drywall in between—the same color. Using a sprayer gives the best finish, but a brush and roller work fine too.
-
Use a brush for the corners and edges of the boards.
-
Use a roller for the flat faces of the boards and the drywall spaces.
Conclusion: High Impact, Low Effort
Stand back and look at your wall.
For about $150 in MDF boards and a weekend of work, you have completely changed the architecture of your room. You haven’t just painted a wall; you’ve built a permanent feature that adds character and value to your home.
This project proves that you don’t need a massive budget to create a home you love. You just need a plan, a little bit of math, and the courage to make the first cut.
Ready for the next room?